Blog design and digital scrapbooking elements created by Adori Graphics »
Showing posts with label Embellishments. Show all posts

Monday, May 23, 2011

Happy Graduation!!!

As I mentioned in an earlier post, my husband graduated from the local ADN program.  He's worked extremely hard during the past 2 years to get through the Nursing program - and during the couple years leading up to the program to get all of the requirements needed to be accepted into the program.  Needless to say, I am extremely proud of him for his hard work and dedication to get where he is today.  I know he will make an excellent nurse and his future patients will love him.

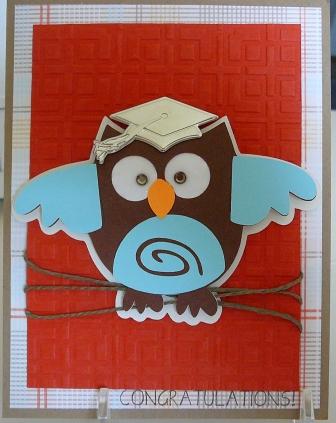
So, to celebrate his graduation, I made him this card.  This is a standard A2 size card.  I made this card a few weeks ago while I was at the Scrapbook Retreat I attended.  I can't recall which cartridge I cut the owl from...sorry.  I did use pop-dots to add a bit of dimension to the owl...didn't want him to be totally flat.

For the eyes I used Glossy Accents to give the eyes a bit of shine and used my I-Rock tool to add some 'bling' in the center of the eyes.  The graduation cap is from a set of embellies that I bought at Archiver's.

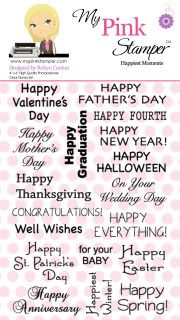
The paper is from my paper stash.  I'm pretty sure the embossing folder is from the Oriental Weave embossing folder set - I used it on the background layer and added some twine to be the 'branches'.  The sentiment is from the My Pink Stamper Happiest Moments set.

Have a great day....
 

Friday, April 22, 2011

Accordion Book

Well, this is the last of my "catch-up" posts showing projects I've made over the last couple months.  This project is an Accordion Book I was inspired to make after watching Robyn's (My Pink Stamper) video - here is the link.  This was my first attempt at an 'album' like this and I really like how it turned out.  Now I just need to figure out either (1) what pictures to put in it, or (2) who to give this to as a gift.

Although I didn't use my Cricut when working on this project - it does in fact have a Cricut cut on it - I used a left over cut from my scrap stash.  I also used my Cuttlebug "Seeing Spots" embossing folder to emboss the front cover.  The "memories" sentiment is from the My Pink Stamper Family and Friends stamp set.  The ribbon is also from my stash and the flower is a Prima flower.

The front and back covers were made by cutting down an 8 1/2 x 11" piece of Recollections cardstock to 4 1/4 x 4 1/4" and layering 4 pieces together for both the front and the back.  All in all, I cut 8 pieces to 4 1/4" x 4 1/4".  The inside was created by using 3 sheets of 8 x 8" DCWV cardstock and scoring it.  For detailed instructions on how to score it - please check out Robyn's video.  I then adhered the 3 pieces together and adhered the 'inside' pieces to both the front and back covers using my ATG gun.

Have a great day.....
 

Wednesday, April 20, 2011

Baby Shower

This is a baby shower card I made for a co-worker - he and his wife were expecting their 2nd child.  They were blessed with their second daughter, Mia, on 03/21/11.

The card is standard A2 - 5 1/2 x 4 1/4".  For this card, I used Recollections cardstock and DCWV paper - the DCWV paper is the white paper that has the boxes on it..  The baby carriage was cut Designer's Calendar cartridge - sorry, I don't remember the size.  I embossed the carriage with my Cuttlebug to add a bit of texture and also added a brad I had in my stash.  I used a Martha Stewart punch around the page border bunch on the background paper.  The sentiment is a stamp.  I used pop-dots to add some dimension to the card.  Not sure you can see it - but there is also a piece of brown ribbon (from my stash) on the background layers.


Our entire team signed the card and gave it to him along with some gifts from the team.

Thanks for stopping in and having a look.  I hope you have a fabulous day!
 

Monday, April 18, 2011

Happy Birthday

Today I have another project I made a while back....I made this birthday card at the monthly crop I attend in February for my SIL whose birthday was on 03/29/11.  She loves cats and her favorite color is purple - so I wanted to combine both in her card.

This is a standard A2 size card.  I cut the cat from the Rock Princess cartridge - page 53.  The green layer was cut using one of the Spellbinder's Nestabilities sets - Labels Eight.  The paper and ribbon is some that I had in my stash.  I added some Stickles to the headphones to make them pop a bit.  The "Happy Birthday" sentiment is a sticker I had in my stash - it's from Creative Memories.

Have a great day.....
 

Sunday, January 09, 2011

One Sheet Wonder Christmas Cards

I made a few projects and cards over the holidays....and though the holidays are over, I thought I'd make a few posts over the next week or so showing you what I made.  Better late than never, right? :)

First up, are some of the Christmas cards I made for my co-workers - I made a few other cards as well but will post them separately.  For this set of cards I used a One Sheet Wonder template created by Kimberley Morris - click here to visit her blog and to download the pdf instruction sheet and template.  Thanks to the template I was able to get the cards done fairly quickly.  All of the cards are standard A2 size.

Most of the cards are simply embellished using Christmas stickers I had on hand.  Can you believe I didn't use any Cricut?  I did use the iRock tool on one of the cards, the Cuttlebug on one, and some ribbon on another.  But I decided to keep most of them pretty simple.  (I apologize for the picture quality - I took the photos with my phone as I didn't have my camera handy.)


Hope you enjoy them....I'll have another project posted soon.  Have a great day....

Jess

Monday, June 14, 2010

Shower Favors

I got the Bridal Shower favors for this coming Saturday done.  Now I just need to make one of the purses from the Forever Young cartridge to hold the favors...and do that times 15. :)

"Candle Pops"
First, I made some "Candle Pops" that I found on Audrey's blog (Cute and Some).  To make these, I bought some tealight candles at Target in purple and white (wedding colors).  Then I attached a lollipop stick to the bottom of the tealight with my hot glue gun.  I then cut 1" circles out of adhesive labels to cover the back - to hide the stick and hot glue.  Lastly, I wrapped a piece of tulle around the 'pop' and tied it with a ribbon.  For the purple tealights, I used white tulle and a light purple ribbon.  For the white candles, I used purple tulle and white ribbon.

Altered RSVP Pen
I also made some Altered RSVP pens.  I got the idea from the SplitcoastStampers site....you can view the tutorial here.  However, instead of using designer paper, I used some Avery labels and stamped them.  I then adhered the stamped label to the ink barrel.

Post-It Note Holder - Matchbook Style
I then made some Post-It Note holders.  Again, I got this idea from the SplitcoastStampers site....tutorial can be viewed here.  To fit a 3 x 3" post-it note, I cut the white cardstock at 3 1/8" x 9 1/4" and then scored it at 3 3/8", 3 3/4", and 7 3/4".  I used 2 different EK Success border punches on the bottom flap and added some purple ribbon.  For the cover, I cut some dark purple cardstock at 3 x 3", then layered some lighter purple cardstock, cut at 2 3/4 x 2 3/4".  I inked the edges of both pieces, and the tag, with VersaMagic Chalk Ink in Purple Hydrangea.

Next, I cut the "Thank You" from light purple cardstock at 1 1/2" using my gypsy and the Tie the Knot cartridge.  I used the gypsy so I could use the hide contour feature to hide the little hole/opening that is supposed to be at the top of the tag.  I then used hide contour to hide the wording so I could get a solid tag and cut it in white so I could layer it behind the purple tag.  I used "Fabric Fancies" Flowers in Opal, from Prima, to add a 'final' touch.  For the center of the flowers, I added a metallic purple brad to some and a purple skittle to others.  I used different combination's for the flowers.  I used a Zot dot to adhere the flowers and pop dots to adhere the tag.

All in all, I got quite a bit accomplished yesterday.  Now, I just have to finish the 'holders' for the favors and order the cupcakes.  Work is going to be crazy busy this week and I'm sure I'll be working late most nights, so not sure when I'll be able to fit it all in yet.  Luckily, I have a crop to go to Friday night, so I may have to work on all 15 purses during crop so I can get them done in time for the Shower Saturday.

Have a great day!

Tuesday, July 28, 2009

Shopping Sites??

Well, I've been looking at the craft stores (i.e. Michael's & AC Moore) as well as Wal-Mart and Target for an assorted pack of embellishments as well as some "bling" to add to my scrapbook pages and craft projects. I can't seem to find any embellishment assortment packets that have a variety of items. I also haven't been able to find any "bling". I guess I'm going to have to do some digging into some online sites to see what I can find. The only bad thing about that is that I'm working on a project that I need some embellishments/bling for and can't seem to find what I'm looking for. If you have any suggestions on sites or places to look, please leave me a comment. I would appreciate any suggestions you have.

Also, I've been browsing through the blogs I follow/subscribe to and reading through the message boards at cricut.com and really like the way projects turn out when they are embossed. I guess my next "big" purchase, if I can convince my hubby :), will be an embossing tool/machine.
Powered by Blogger.
 
Free blog design by Adori Graphics using the Carefree Summer digiscrapping kit by Adorible Digital Designs