Blog design and digital scrapbooking elements created by Adori Graphics »
Showing posts with label Cricut. Show all posts

Monday, August 22, 2011

School Days

So, it's that time of year when kids are getting ready to go back to school.  Since we don't have any young children and my stepson lives with his mom, I don't experience the back-to-school frenzy.  However, a dear friend of mine has twins and they are getting ready to start Kindergarten this year.  They are the sweetest boys and in order to celebrate their 1st day of school, I thought I'd make them a little "treat".

I made these cute little treat bags for them.  The bags aren't quite complete yet.  I still need to go to the store to get a couple more things to add to them but I thought I'd go ahead and share the bag toppers that I created.

The background paper is from the DCWV "The Glitter Stack".  I cut the paper for the topper at 5 x 6" and then scored it at 2 1/2" and folded it in half - the final size of the topper is 2 1/2" x 6".  The school supplies are from the Simply Charmed cartridge and are cut at 1 1/2" each and the "School Days" sentiment is from the 3 Birds on Parade cartridge and is cut at 1".  Although you can't really see it in the picture, I added some Glossy Accents to the scissor blades and the glue trail to add a little bit extra.

I also made the cute little apple paper clips using the Creative Memories Cheerful Seasons cartridge.  The apples are cut at 1 1/2" also.  I used pop-dots to adhere the two sides of the apple to the paper clip.


I really love how the bag toppers turned out...I hope the boys enjoy them too. :)

Have a crafty day.....

Photobucket

Monday, May 23, 2011

Happy Graduation!!!

As I mentioned in an earlier post, my husband graduated from the local ADN program.  He's worked extremely hard during the past 2 years to get through the Nursing program - and during the couple years leading up to the program to get all of the requirements needed to be accepted into the program.  Needless to say, I am extremely proud of him for his hard work and dedication to get where he is today.  I know he will make an excellent nurse and his future patients will love him.

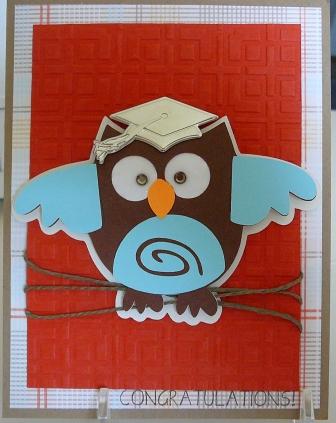
So, to celebrate his graduation, I made him this card.  This is a standard A2 size card.  I made this card a few weeks ago while I was at the Scrapbook Retreat I attended.  I can't recall which cartridge I cut the owl from...sorry.  I did use pop-dots to add a bit of dimension to the owl...didn't want him to be totally flat.

For the eyes I used Glossy Accents to give the eyes a bit of shine and used my I-Rock tool to add some 'bling' in the center of the eyes.  The graduation cap is from a set of embellies that I bought at Archiver's.

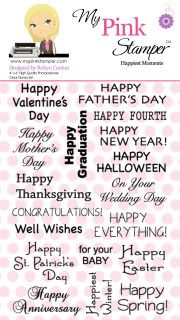
The paper is from my paper stash.  I'm pretty sure the embossing folder is from the Oriental Weave embossing folder set - I used it on the background layer and added some twine to be the 'branches'.  The sentiment is from the My Pink Stamper Happiest Moments set.

Have a great day....
 

Saturday, April 23, 2011

A 2nd Expression Giveaway

I just found out that Everyday Cricut is also having an Expression 2 giveaway in honor of the E2 launch on HSN on 04/26/11.  I would love to win one - I'm sure you would too.  Although I wish I could keep it to myself and increase my chances of winning :)...that wouldn't be very nice, would it?  So, I'm sharing the info with my crafty friends.  Hop on over to the Everyday Cricut blog and check it out - while you are there, check out all of their fabulous projects!  Joy and Melanie are very creative.

Good Luck to everyone that enters!!

And don't forget to check out the E2 launch on HSN at midnight on 04/26/11.

Have a great day.....
 

Friday, April 22, 2011

Expression 2 Giveaway

The giveaway isn't here on my blog...but I do know where you can go to enter to win. :)


To enter, stop by Robyn, My Pink Stamper's, blog.  ProvoCraft donated an Expression 2 for Robyn giveaway on her blog in celebration of the launch on HSN on April 26th.  Robyn will choose the winner right before the launch during her My Pink Stamper Live broadcast.

You still have plenty of time to stop by and check out her blog and enter to win...so head on over before you miss out.  She has posted several ways to enter.  Good Luck!

Monday, April 18, 2011

Happy Birthday

Today I have another project I made a while back....I made this birthday card at the monthly crop I attend in February for my SIL whose birthday was on 03/29/11.  She loves cats and her favorite color is purple - so I wanted to combine both in her card.

This is a standard A2 size card.  I cut the cat from the Rock Princess cartridge - page 53.  The green layer was cut using one of the Spellbinder's Nestabilities sets - Labels Eight.  The paper and ribbon is some that I had in my stash.  I added some Stickles to the headphones to make them pop a bit.  The "Happy Birthday" sentiment is a sticker I had in my stash - it's from Creative Memories.

Have a great day.....
 

Sunday, April 10, 2011

Retirement / Congrats Card

Wow....I sure have been MIA for a lot longer than I intended.  I have crafted some...but just haven't been around to post my projects.  So, I'm going to try and post some of the projects I've made in the last couple months.

First on the agenda....a Retirement card I made for a co-worker.  I made this card for my co-workers and I to sign and give to her - we also included a small monetary gift. :-)

For this card, I used the new cartridge Elegant Edges.  I love this cartridge.  If you are a fan of border punches this cartridge is a must have.  Several of the cuts remind me of the punch around the page border punches - LOVE it!

This card is based on the sample project (12x12 scrapbook page) that is included at the front of the cartridge handbook (see pg 10)...but I had to size it to fit on a 5" x 5" size card.  The layers are cut using the Loops Key at the following sizes:

White - 5"
Dark Purple - 4 3/4"
Purple - 4 1/2"
White - 3" (Shadow Key)
Light Purple - 2 1/4" (Shadow Key)

I don't remember which cartridge I used to cut the "Congrats"....sorry.  I thought I had written it down but it appears not.  I also added a piece of ribbon that I had in my stash.

Thanks for stopping by...Have a great day.
 

Friday, October 29, 2010

Robotz Birthday Card

One of my nephews, Nate, turned 11 at the beginning of October.  I can't believe how quickly he and his brother, Cam (9), are growing up - it seems like just yesterday they were itty bitty.  They are my brother-in-laws sons and since the day I met those 'little' boys in 2001, they have been my 'babies' and have held a very special place in my heart.  Luckily for me, although they've gotten older and bigger, they still love to get hugs and kisses from Aunt Jessica -- although I'm sure that'll change once they hit the teenage phase. :-)

You may remember that I made a Robotz birthday card during the MPS National Scrapbook Day challenge (you can see it here) - that card was for Cam's birthday.  Since he loved his card so much (at my MILs birthday dinner, when she was showing the card I made her, he yelled out that I had made him a Robot card for his birthday), I decided to make Nate a card using the Robotz cartridge also.

I think I cut the Robot at around 3" (don't recall for sure, sorry) and I used the font from the same cartridge to cut the "Happy Birthday" sentiment (at 3/4", I think?).  I tried to keep the colors bright and cheery and I love how it turned out.  I used the Spots and Dots Cuttlebug folder to add some texture to the background.  The confetti ribbon and balloon are some buttons I had in my collection.

Nate was so excited when he opened his card - it made my day that he enjoyed it so much.  Thanks for stopping in and taking a peek....have a great day.....

Thursday, October 28, 2010

Birthday Card using Birthday Bash

My darling hubby's birthday is today.  The last week of October is a busy birthday week in our family as my birthday, hubby's birthday, and his youngest brother's birthday are all within the same week.  Generally, we do a combined birthday dinner/get together for the family since all of our birthdays are so close; however, this year, my BIL won't be home for his birthday as he has joined the Navy and left for boot camp on Monday.  But I digress.....

This is the card I made for my hubby's birthday using the new Birthday Bash cartridge.  Although he'll be 33, he's like a big kid at times, so I thought I'd make him a cutsie card. :-)  The elephant is cut at 3 1/2".  I used the Swiss Dots embossing folder to add some texture to his blanket.  I used my white gel pen to add some doodling around the border of the card and the Happy Birthday sentiment are 2 buttons from my stash.  I left it somewhat simple as I didn't get home from work until late this evening and needed to get it made before hubby got home from his clinicals.  Luckily I got it done just in time to hide it away before he got home.

I hope you have a fabulous day...it's almost Friday....

Wednesday, October 27, 2010

Birthday Card

My Brother-in-Law's birthday was Sept 11.  This is the card I made for him.  The present was a leftover cut I had left over from a prior project - it's from the Celebrations cartridge.  I also used the Martha Stewart Ribbon Loop border punch and some balloon buttons from my stash.  The background is embossed with the Happy Birthday Cuttlebug folder and the sentiment was stamped using My Pink Stamper's Simply Sweet Occasions stamp set.

Sorry I'm short on details...unfortunately since I made this card a while ago, I don't remember all the specifics. 

Have a great day.....

Tuesday, June 01, 2010

Fabulous!

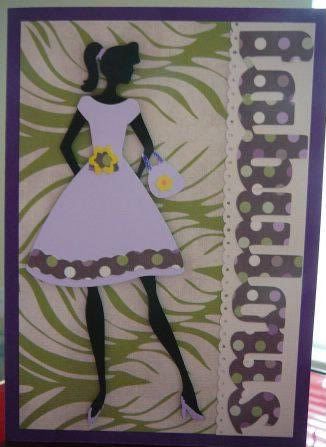
This is a card that I've been wanting to make for a couple weeks but didn't get around to finishing until this weekend.  I've been dying to use my Forever Young cartridge and make one of the "fabulous" and "hip" woman cuts.

This is a 5 x 7" card.  Unfortunately, I don't remember what size the woman or the sentiment is cut at as I cut these out a couple weeks ago while I was at a crop.  I'm thinking they were cut around 6"....but I could be wrong.  The base of the card is a sheet of purple cardstock cut to 10 x 7" and folded in half to create a 5 x 7" card.  The mat is from the DCWV Latte Matstack.  The paper used for the sentiment and the mat under the sentiment is also from this matstack.  I love the papers in this stack - they are really soft looking.

The dress is cut from a light purple cardstock and the flowers on her dress and pocketbook are cut from a yellow cardstock.  The band at the bottom of her skirt and part of the flower at her waist are cut from a scrap sheet of paper left over after cutting the sentiment.

To add some detail, I used a Souffle pen in purple to add the hair band and her shoes.  I also used an orange pen to add the center of the flower on her pocketbook.  I also added some bling to the yellow flower at her waist with Diamond stickles and to the handle of her pocketbook with Starry Night stickles.  I used an EK Success border punch to add a bit of detail to the mat for the sentiment.

I really like how this turned out and have a dear friend in mind to give this.  Have a great day..

Friday, May 21, 2010

Mother's Day Card

Good Morning all -

First, I want to show you the Mother's Day card I made for my MIL.  I'm a bit late posting this as I was waiting on my hubby to send me the picture of the card he took with his cell phone before giving her the card.

This is an A2 size card.  I used the Mother's Day cartridge and cut the "lace" at 4" and layered it on the shadow.  I also cut the "Mom" using the regular and shadow cuts.  I don't remember what size this was cut at.  For the inside, I printed "Happy Mother's Day" on a piece of paper and adhered it.

It's a very basic card that still came out somewhat elegant.  I really love how the colors pink and brown look together.

(Sorry for the pic quality - hubby had to take with his cell phone as I forgot to take a pic before giving it to him to give to my MIL along with her present...and then he forgot to take a pic with the camera before leaving the house.)


Have a great day.....

Saturday, May 01, 2010

NSD - My Pink Stamper Challenge #5

Well, at long last, I finally got Challenge # 5 - "Teacher Appreciation Days" - ready to go.  This challenge had perfect timing for me as one of my co-workers asked me to make 2 Teacher Appreciation cards for her so she can give them to her son's teachers.  So, I used this challenge to make both cards.


For both cards, I used the Preserves Cartridge and cut the apples (and all layers) once at 2" and again at 2 1/2".  I used Apple #3 and Apple #4.  The apple paper is some that I got in a paper back from the $1 Spot at Target.  The "Thank You" sentiment is from the Sweet Occasions stamp set by My Pink Stamper.  I also used the Divine Swirls embossing folder on the green strip of paper on the one card.  I used my Inkadoo white gel pen to add some doodling around the edges of the flowers.


On the inside of the cards, I used a white mat so that my co-worker can write a nice note to her son's teachers and then added a flower on the corner.

Well, on that note, I think I'm off to bed.  Sadly I didn't manage to keep up with the challenges and get all 12 done....so I'll resume with Challenge #6 in the morning and try to finish up the remaining 7 challenges tomorrow.

Good night all.....

NSD - My Pink Stamper Challenge #4

The NSD Challenge #4 over at My Pink Stamper's blog is "I Like You the Least."  Want to guess what that challenge means???  The idea was to use your least favorite or least used cartridge.  This was another hard one for me as I have over 40 cartridges but due to work and other obligations I haven't really had a chance to use most of my cartridges...some I've only used once or twice and some I haven't used yet as they are still new and I haven't had a chance to play yet.  Today is definitely a good day to start. :-)


So, for this challenge, I decided to use Accent Essentials for 2 reasons: (1) I've never used the cartridge and (2) I never seem inspired by the cuts on the cartridge.  I kept my card pretty basic.

I started with an A2 size base in white.  Next I cut the DCWV paper at 3 3/4" x 5".  The strip of paper down the middle is cut at 1" x 5".  The flower is from page 77 of the Accent Essentials handbook and is cut at 3" using the shadow layer (white), base layer (yellow) and shift key (green).  I decided to run the flower through the Cuttlebug using the Swiss Dots embossing folder before pop-dotting it onto the card.  Then I added a bit of ribbon and punched the tag using an EK Success punch.  The sentiment is from My Pink Stamper Sweet Occasions stamp set and is stamped in green ink using a Stampabilities ink pad.

Now, on to Challenge #5....


Baby Shower Card

Hope everyone is having a great day!  Here is another quick card I made the other night.  I didn't do any crafting last night as hubby and I had a date night.  We went to dinner and the movies.  Ironically, we saw the movie "Date Night" while we were on our date night. :)  The movie was pretty funny.

Since today is National Scrapbook Day, I'm planning on doing some crafting.  I'll be joining in the fun at Robyn's (My Pink Stamper) blog and joining in on the challenges she has going on.  She will be holding challenges from 10 am to 10 pm - for a total of 12 challenges and 12 prizes.  If you have time, you should join in.  Alright, on to the card I made.....

My co-worker whom I made this card for is decorating the baby's room in pink and brown....so I figured I would do the card in pink and brown to match her theme. 

I started with an 8 1/2 x 11" piece of brown cardstock and cut it in half to get an A2 size card.  Then I cut a piece of pink cardstock (it has a white core) to fit the front but leave a slight border at the to and bottom.  I embossed it using the Cuttlebug Argyle Embossing folder. 

The baby carriage was cut using the Mother's Day seasonal, limited cartridge using both the regular and shadow cuts.

Next, I adhered a piece of ribbon to the bottom of the pink cardstock.  I also used my EK Success Scalloped Scallop Border Punch to add some detail to the bottom of the card.  Lastly, I added some stickles to the top 2 corners on the front of the card.

For the inside, I cut a piece of white cardstock to and used a stamp from the Cloud 9 Designs Simple Thoughts - Baby set for the sentiment.  The stamp was stamped using Stampin' Up Craft ink pad in Chocolate Chip. 

I just received my 1st Stampin' Up ink pads within the last week - I ordered Chocolate Chip and Whisper White.  This is the 1st project I made using my new ink pads....and I have to say I love these ink pads.  I will definitely need to buy some more.

Wednesday, April 28, 2010

Couple Cards using "Just Because" Cartridge

Last night when we got home from the funeral, I decided to make 2 quick cards for some co-workers.  So, I dug out my "Just Because" cartridge - I love this cartridge....it is so easy to use and get all the cuts for the card to correlate to the size of the card.  I did run into some trouble with one of the envelopes though....and due to the lateness of the hour when I was working on it (11 pm), I ended up giving up on trying to figure out.  I'll give it another shot this weekend and will get it figured out. :)

Both of these cards were cut with the size setting at 4" but the sizes turned out quite differently.

Thanks for taking a look....Hope you enjoy.

Sunday, April 25, 2010

Sympathy Cards

Sorry I've been MIA again for a while.  As I mentioned in my prior post, my husband's step-grandfather was diagnosed with cancer and given 2 months.  When hospice arrived at their house following his arrival back home and the diagnosis, they advised that it would likely be 2 weeks.  On Friday evening/Saturday morning, he passed away.  My MIL called us at 1:14 am on Saturday morning to let us know.  The viewing is Monday evening and the funeral will be held on Tuesday afternoon.  He is in a better place and no longer suffering.  He is survived by his wife, my husband's grandmother, and his stepchildren, which include my MIL, my husband's aunt and his uncle.

I made some sympathy cards for my husband's grandmother and for my MIL.  Sympathy cards are so difficult to make; however, after doing a search on the Cricut message boards, I was inspired by cards made by dj1952 and Pinklady50.  You can check out their cards here.

I used a 5x7 pre-made card for the base.  I then cut some black cardstock at 4 x 6 and some white card stock to fit.  The size of the inside white cardstock is a bit different on both cards.

I then cut the bird and cherry blossom branch using the Home Decor cartridge.  The size of the bird on the card with the pink ribbon is 1 3/4" and on the card with green ribbon is 2".  Sorry, I don't remember what size the cherry blossom branch was cut at on the card with pink ribbon.  On the card with green ribbon, I believe I cut it at 3 1/4".

Next, I used the cherry blossom embossing folder from the Asian Cuttlebug set and ran the white cardstock through.  Then, I tied the ribbon around and adhered all layers.

Finally, I stamped the sentiment onto a white block and placed it on a black background.  I used pop-dots to give the sentiment block some dimension.

For the inside, I'm planning to write some text using the computer.  Browsing through the Cricut message boards, I came across a Sympathy card with text that I thought would be good to use. (view)  Therefore, the inside on both cards will read:

Praying for friends to comfort you,
faith to uphold you,
and loving memories to heal your heart.

I've got a few other cards to work on as well.  I'm not sure with everything going on this week if I'll get around to posting them....but hope to have them posted by next weekend.

I hope you all have a peaceful Sunday afternoon/evening and a great week!


Friday, September 18, 2009

Birthday Card

I made this birthday card for my boss last week. It's a simple design but I really like the way it turned out.


Ingredients:
Cartridges: Celebrations (Cupcake), Winter Woodland (Scallop Square); Stickles: Pink Cotton Candy; Cuttlebug Embossing Folders: Happy Birthday; Stamp: Inkadinkado - All Occasions (97627); Misc: Ribbon, Cardstock

Tuesday, September 15, 2009

Cricut Celebrates 100th Cartridge - Week 2

Cricut is continuing the celebration of the release of their 100th cartridge, Winter Woodland, this week. To help celebrate this achievement, Cricut is giving away 100 cartridges over the next five weeks -- that's 20 cartridges per week.

To enter the giveaway, you need to register through the Cricut website and reply to the post regarding the celebration.

Good Luck to all that enter!

Wednesday, September 09, 2009

Cricut Celebrates 100th Cartridge

Cricut has just released their 100th cartridge! Can you believe it - 100?? I didn't realize there were that many...boy, am I'm missing a ton. :)

The 100th cartridge released is the awesome Winter Woodland cartridge...and it's out just in time for you to start all of your holiday projects. This cartridge is a ton of fun and has some great surprises on it. It has a really pretty font on it (not shown on the back of the box)-- which is one of the special features. You can use this cartridge to make 3-D houses...really cool!

Check it out at: http://www.cricut.com/shopping/ProductDetails.aspx?id=361&s=1&sc=2

I've already used this cartridge a bit on some note cards I am working on for a Christmas present and plan on using it quite a bit more in preparation for the holidays.

Congrats ProvoCraft & Cricut! I look forward to seeing what you have in store for us with the next set of cartridges released.

P.S. In honor of this achievement, Cricut is giving you a chance to win a cartridge. Check it out on the Cricut messageboards.

Saturday, August 29, 2009

Bridal Shower Card & Tags

Well, it's been a long week and unfortunately I didn't get much "crafting" done this week...although I did spend some time on the Cricut message boards.

Friday night, I did finally manage to play with my E for a bit. I made a bridal shower card and some gift tags as I was attending a bridal shower on Saturday afternoon. The bride-to-be is marrying my husbands best friend -- they have been friends for a LONG time and are more like brothers than friends. The groom and bride-to-be are very dear to us and we love them dearly. I am so thrilled for the two of them -- they are a very sweet couple and I wish them a lifetime of love and happiness.
Powered by Blogger.
 
Free blog design by Adori Graphics using the Carefree Summer digiscrapping kit by Adorible Digital Designs