I'm so sorry I'm late posting the winner of the My Memories Suite software giveaway....I wasn't feeling well on Sunday and yesterday I didn't get home from work until late in the evening and I ended up going straight to bed.
So, without further ado.........there were only 2 comments on the giveaway post so the winner had a 50/50 shot.....using random.org with a selection criteria between 1 and 2.....the winner is.....................
My Memories Suite has a great assortment of kits! I love the Cherished kit, Christmas Traditions, and Sweet Caroline to mention just a few.
I too, saw this when you first posted it and wasn't going to enter for the same reason. However, I do have a birthday coming up and the kits would be a great, reasonably priced gift idea.
Thank you for a chance to win. I follow by email, love that option!
Wow....no one has entered for the My Memories Suite giveaway....not sure if it was due to the timing or not since I posted it over the Labor Day holiday. Things have been crazy this week and the rest of the week will be extremely busy...so, I'm going to extend the deadline for a few more days. Please post a comment telling me the kit you like best from the My Memories Suite site on the original post (here) by Saturday, 09/17/11 and I'll draw a winner on Sunday.
Tomrrow is the last day to enter the giveaway for the My Memories Suite....so far no one has entered so you have a really good shot at winning if you leave a comment at this post.
I hope you have had a great week! Mine has been extremely busy....it's that time of year where work gets really busy and my crafting time is at a minimum. I received a couple crafty packages this week so I'm hoping I can do some crafty projects this weekend.
My hubby and I got married in 2007....here it is 4 years later and I still haven't created a scrapbook of my wedding pictures yet. Can you believe it? I keep meaning to get started on the album but just haven't seemed to get around to it.
As I was sitting at my computer this evening and watching TV, I got to thinking I could 'play' with the My Memories Suite software and do a digital layout of my wedding pictures. I have a friend whose albums are a mix of digital and traditional layouts...so I thought I would get started by doing a digital layout so I can print it out later and add it to the album when I start on the traditional layout pages.
If you haven't read my review of the My Memories Suite software, check it out here. Don't forget to leave a comment HERE for a chance to win a free copy of the My Memories Suite software.
Here is a layout I was able to put together in about 30 minutes using a pre-designed layout and customizing the paper and embellishments. The part that took the longest was deciding which pictures to use. :) I really like how it turned out - I prefer simple layouts and not a lot of embellishments, although you can add as many embellishments as you want with the software program.
These pics are of us cutting our cake - can you tell we had fun?
Thanks for stopping by....don't forget to go to my post from Monday to enter for a chance to win a free copy of the My Memories Suite.
I hope you had a great weekend! I've been enjoying my long weekend - I don't have to go to work today since its Labor Day and our office is closed. (woo hoo) I didn't get to do any crafting yet this weekend...but hope to do some today.
My hubby and I left Saturday afternoon and headed to the Outer Banks. Unfortunately, the southern area of the Outer Banks is still recovering from Hurricane Irene so we were only able to explore the northern portion. But the weather was beautiful and we were able to ride around with the top down on the car. Since we couldn't explore the southern part, we headed back home Sunday afternoon....although it was a quick trip, it was definitely fun. We will definitely be heading back that way in the future...we really want to check out the Southern portion (i.e. Hatteras and Ocracoke areas).
Today I have a new type of post for you......it's my first product review. : ) After you read about the product that I was given the opportunity to review, be sure you stick around as I have a giveaway and offer for you too.
Have you ever tired digital scrapbooking? About a week ago I was given the opportunity to receive a copy of a digital scrapbooking software program. The software program I got to try was My Memories Suite - a super fun and creative program. It makes creating digital scrapbook pages a breeze. But....it's not just for scrapbook layouts. You can also use it to make cards, calendars, use it for your kids school projects.....there are so many unique projects you can make with the My Memories Suite software. Check out this video for a bit more info!
I love to use my Cricut and scrapbooking tools to create cards and scrapbooks....however, the My Memories Suite software gives me the chance to to get a layout done so much quicker. I can test the look and change the layout and/or embellishments much quicker and easier than when using traditional scrapbook tools to cut and enhance my paper layouts. I've been a bit scared of digital scrapbooking in the past....but this software made it so easy for my first time!
Here is just a quick page I put together in just about 10 minutes - the longest part was picking out which pictures to use and choosing the layout/arrangement to use. I kept the layout fairly simple as I didn't want to take away from the gorgeous scenery in the pictures....the mountains were absolutely breathtaking. This layout shows some of the pics of me taken while I was on vacation in Austria with my parents and my brother and his girlfriend earlier this summer. I did a couple other layouts as well....but since they are of pics of my family, I'm not able to post as my family doesn't like their pictures shared.
I also made this super quick card front as I was just playing with all the different features the program has. Since Halloween is coming up, I thought I'd play around with a Halloween theme and colors. Of course, you could easily convert this into a scrapbook page by just removing the Happy Halloween sentiment (or minimizing the sentiment) and adding a picture.
I definitely recommend this software and encourage you to check it out. It has so many cool features and is easy to navigate -- you can start using it immediately after you've downloaded it to your PC. You can use one of the pre-designed layouts or you can design your own from scratch. You can even download kits to enhance/use with the default items that come with the software. : )
It's such a fun program that I have a special opportunity for ONE of my blog readers. How about a chance to win a free download copy of the My Memories Suite program (a $39.97 value). My Memories Suite has generously offered to sponsor a give away on my blog so that one of my readers can receive a download copy of the My Memories Suite software. How awesome is that??
To enter to win:
Go to the My Memories Suite site (MyMemories.com) and take a look around.
Leave a comment on THIS post and let me know what your favorite Digital Scrapbooking Kit is from the MyMemories.com website.
Leave your name and e-mail address in your comment so I know how to reach you.
Note: You do not have to be a follower of my blog - however, I would love it if you would become a follower. :)
Giveaway Deadline: I'll leave the giveaway open for 1 week...so that means the giveaway will go through September 12, 2011September 17, 2011- all comments must be posted by 09/12/11 09/17/11 at 11:59:59 pm. I will select a winner using random.org on September 13, 2011 September 18, 2011 and will post the winner on my blog. So make sure you stop back by on September 13th 18th to see if it's you!
The lucky winner will receive a unique promo code so that you can download the My Memories Suite software to your personal computer at NO cost.
GOOD LUCK EVERYONE!!
But......that's not all..........
My Memories Suite is also giving my readers a discount code to use so that you can get $10.00off your purchase of the software and download it to your computer right away. The regular prices is $39.97 - with the $10.00 promo code, you can get it for just$29.97. Let me tell you - it is definitely worth it!
To get the $10.00 off - just use the below promo code during the checkout process and you'll be all set and ready to start using the software right away!
Promo Code: STMMMS92945
If you want to learn more about My Memories Suite, check out the following links:
Thank you so much for stopping by....Good Luck to everyone who enters the giveaway! I'll be posting another layout in a couple days...and I'm sure you'll see some future projects using this software.
Have a crafty day.....
Disclaimer: As this is my first product review, I want to be sure that everyone is aware that while I did receive my copy of the My Memories Suite software at no cost so that I could review it, I was under no obligation to post a positive review and am not being compensated for my review. The thoughts expressed in my post above are my own opinions and thoughts of the program. Although I'm not being compensated for my review, I will receive a referral fee when the promo code provided is applied at checkout.
My Mother-in-Law's birthday was earlier this month. Her birthday fell on a Saturday so I thought it would e nice if we went to get a mani/pedi together. So, I picked her up and we headed to the nail salon and got our mani/pedi's...it was soooo relaxing. Afterwards, we decided to head to Michael's to check out what goodies they had and then we swung by Walmart and happened upon some Cricut Lite cartridges that were on sale. I ended up taking her back home and dropped her off at her house around 4:30 pm. While we had a great time, that also left me little time to go home to get ready for the surprise birthday dinner my Father-in-Law had planned and to make a card. :)
Luckily, I was able to create a 'quick' yet beautiful card using my Imagine More Cards Imagine cartridge. Using my Imagine I was able to get this card made, get ready, and still make it to the restaurant within an hour and a half. :)
I added some Stickles around the outside of the cake to spice it up a bit. But other than that, I pretty much left everything as is.
I don't generally work on cards for upcoming events in advance....because I'm a procrastinator I tend to make birthday cards pretty much at the last minute because I always want to spend time on other things. Well, this time, as I was in my craft room and didn't already have a project in mind, I decided to go ahead and make a birthday card for my friend whose birthday is on 9/8.
For this card, I used the Cricut Imagine Lori's Garden cartridge. I cut a lavender piece of 8 1/2 x 11" card stock in half and then folded the cut piece in half for a 4 1/4 x 5 1/2" card. I then used Lori's Garden to cut the background papers and the bird, branches, and Happy Birthday sentiment. The 2 background cuts are from the imagine stock imagines and I filled them with paper patterns from Lori's Garden. Unfortunately, I didn't write down the cut sizes but I'm pretty sure they were as follows: Background Layer 1 - 3.5", Background Layer 2 - 3.2", Bird - 3", Flower branch - 3", Happy Birthday sentiment - 1.5".
I cut the bird in layers and then used my zig adhesive to adhere all of the layers. I also cut out an extra flower branch and placed it so it appears to be part of the same cut. I used pop-dots to adhere the final image and sentiment to the background cuts.
I'm really pleased with how the card turned out. I think it looks very elegant and can't wait to give it to my friend on her birthday.
Thanks for stopping by....I hope you have a crafty day.....
So, it's that time of year when kids are getting ready to go back to school. Since we don't have any young children and my stepson lives with his mom, I don't experience the back-to-school frenzy. However, a dear friend of mine has twins and they are getting ready to start Kindergarten this year. They are the sweetest boys and in order to celebrate their 1st day of school, I thought I'd make them a little "treat".
I made these cute little treat bags for them. The bags aren't quite complete yet. I still need to go to the store to get a couple more things to add to them but I thought I'd go ahead and share the bag toppers that I created.
The background paper is from the DCWV "The Glitter Stack". I cut the paper for the topper at 5 x 6" and then scored it at 2 1/2" and folded it in half - the final size of the topper is 2 1/2" x 6". The school supplies are from the Simply Charmed cartridge and are cut at 1 1/2" each and the "School Days" sentiment is from the 3 Birds on Parade cartridge and is cut at 1". Although you can't really see it in the picture, I added some Glossy Accents to the scissor blades and the glue trail to add a little bit extra.
I also made the cute little apple paper clips using the Creative Memories Cheerful Seasons cartridge. The apples are cut at 1 1/2" also. I used pop-dots to adhere the two sides of the apple to the paper clip.
I really love how the bag toppers turned out...I hope the boys enjoy them too. :)
Do you want to know what 1000 sheets of paper looks like?? Well, wait no more....check it out below. :)
Do you want a chance to win some of the paper?? If yes, you need to check out Amy's blog post. She is giving away some great prizes in addition to the 1000 sheets of paper....so stop by and check it out for your chance to win!
I'm so excited....I spent most of the day yesterday playing with my blog and trying out different layouts/designs and finally landed on a template design that I like. No major crafting plans today - instead I'm planning to have lunch with a dear friend and spend some time catching up with her. I did do some crafty stuff yesterday - I made some treat bag toppers for my friends sons - she has twins - who will start school for the very 1st time this week. I need to remember to take a picture before I give them to them so I can post them. :)
I hope you all have a fabulous Sunday and a crafty day!
P.S. Let me know what you think of my new blog design - would love to hear your thoughts.
Hope everyone is having a glorious Saturday!! Please pardon the mess....I'm in the process of playing with my blog design and changing things up a bit. I hope to have it all figured out by the end of the day....keep your fingers crossed. :)
I know it's been a long time since my last post. There has been a lot going on lately and I haven't had my mojo so I haven't been crafting lately.
I was on vacation for 2 weeks and went to Germany with my parents, brother, and his girlfriend....so I'll be starting on a scrapbook with those pictures soon. Assuming my mojo comes back soon. :)
First I have to get my craft room back in order.... we recently got new carpet in the house and I had to pack up my entire craft room. So now, I have to get everything back in some semblance of order so I can figure out where everything is. :)
So it will likely be a bit longer before I'm back to posting....but I wanted to tell you thanks for continuing to stop by and see how things are going.
At the end of April, I headed to a Scrapbook Retreat with my MIL and some girlfriends. This is the 3rd year we've attended the retreat - and we always have a great time. This year, I decided to make a few treats for the girls using my Imagine.
First, I made the cute little tote bags. I got the bags at Michael's for $1 and bought some iron on Fabric Transfer paper at WalMart. I made 4 bags - 1 for each of the girls in our group and one for myself.
I printed the phrase from the Cricut Everyday cartridge (Circle exclusive)....as well as the bughead. I filled the bags with a few miscellaneous stamps, stickers, and embellies that I found at Michael's.
I also made a couple T-Shirts using the same Transfer Paper for my Mother-in-Law. Unfortunately, I forgot to take pictures before I gave them to her...but they were a hit. For Christmas, my hubby and I gave her a Gypsy, so I used the Cricut Everyday cartridge to print out the "Love my Gypsy" phrase for the 1st shirt and another phrase for the other shirt (oops...I can't remember what phrase I used for the 2nd one right now.)
I also added in the tins I got at Michael's that I filled with pretzels. I added the magnets to the top of the tins. I bought the magnet paper at AC Moore and used my Imagine to print the images on the magnet paper as well as to cut the images out. I really like how the magnets turned out - although they are not very strong magnets, I think they will hold up pretty well. The "Snappin' Good Time" image is from the Imagine More Cards cartridge and the bug head is from the Cricut Everyday cartridge.
Here is a pic of the 4 bags along with one of the tins with the magnets attached. I really enjoyed playing with the Cricut Everyday cartridge and doing something a bit different with the magnet paper and the iron on transfers.
Thanks for taking a peek... Hope you have a great day.
This is a Birthday card for my stepson who is turning 16 at the end of the month. I can hardly believe that he's going to be 16 and driving in no time...wow!
The "Happy Birthday" was cut using the Beyond Birthday's cartridge. I added a bit of ribbon at the top for some texture/dimension as well as some skittles at the bottom. The paper is from a Pressed Petals Assorted Openstock Paper Pack I bought at Ross's called "It's a Guy Thing."
As I mentioned in an earlier post, my husband graduated from the local ADN program. He's worked extremely hard during the past 2 years to get through the Nursing program - and during the couple years leading up to the program to get all of the requirements needed to be accepted into the program. Needless to say, I am extremely proud of him for his hard work and dedication to get where he is today. I know he will make an excellent nurse and his future patients will love him.
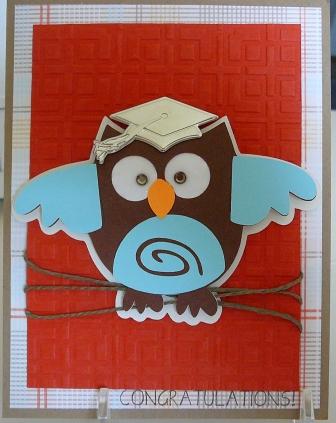
So, to celebrate his graduation, I made him this card. This is a standard A2 size card. I made this card a few weeks ago while I was at the Scrapbook Retreat I attended. I can't recall which cartridge I cut the owl from...sorry. I did use pop-dots to add a bit of dimension to the owl...didn't want him to be totally flat.
For the eyes I used Glossy Accents to give the eyes a bit of shine and used my I-Rock tool to add some 'bling' in the center of the eyes. The graduation cap is from a set of embellies that I bought at Archiver's.
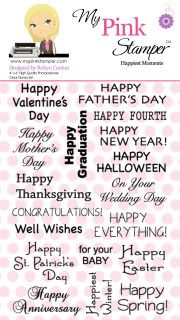
The paper is from my paper stash. I'm pretty sure the embossing folder is from the Oriental Weave embossing folder set - I used it on the background layer and added some twine to be the 'branches'. The sentiment is from the My Pink Stamper Happiest Moments set.
My dad's birthday was last month and this is the card I made and sent to him. I always struggle making masculine cards and I got the inspiration and scrap lifted this card from Creations with Christina. This card uses the Mickey & Friends cartridge. It's a 6 x 6" card. The base of the card is kraft card stock. The car is cut at 3" as are all the layers for the car. I used some hemp twine to add a little texture and some glossy accents to the headlights and door handle.
I love how the card turned out! I made this at the NSD All Day Crop I attended that a friend of mine, who is a Creative Memories consultant, hosted on 04/16/11. It was such a hit, that last weekend while I was at a scrapbook retreat with my MIL and 2 other friends, who were also at the NSD Crop, they each ended up making a Father's Day card using this same Cricut cut.
Well, I didn't quite get to participate in the MPS NSD as I had planned....unfortunately....but I did end up spending some time with dear friends instead and had a great time.
My hubby walking into the ceremony
This past week has been a busy week at our house. Last Saturday, was my husbands pinning ceremony - he graduated from the Nursing program at the local community college. It was a great day and we celebrated with dear family and friends. I'm extremely proud of my hubby and his accomplishment - he has worked hard to get here.
Then this week, my hubby had to pack up pretty much the entire house as we were having new carpet installed. I love our new carpet....but am not looking forward to putting the house back together. My entire scrapbook room was packed up and put in our storage area - so I will be spending most of tomorrow trying to put my room back together. Unfortunately, this means I haven't been able to craft any....and I really need to make some Thank You cards for my hubby to send out.
So, in the meantime, I've scheduled a couple posts that will show some of the projects I made in the last month or so that I haven't posted yet.
It is a beautiful day here. I think I'll head out and run some errands and then start on putting everything back in order. Have a great day.....
If you don't have any plans, go on over and celebrate with My Pink Stamper. She's having challenges each hour throughout the day. Challenges #1 and #2 are already posted. So hop on over and check it out and play along if you are able. I'm hoping to play along; however, I have some plans today so may not be able to get my projects posted until tomorrow.
Happy Easter!! I hope you all have a wonderful day!!
I'm about to head out of town for work - will be back Tuesday night...so I won't be posting for a couple days. Don't forget to enter for your chance to win an E2 at Everyday Cricut and My Pink Stamper...and don't forget to check out the E2 launch on HSN at midnight on Tuesday, 04/26/11.
I just found out that Everyday Cricut is also having an Expression 2 giveaway in honor of the E2 launch on HSN on 04/26/11. I would love to win one - I'm sure you would too. Although I wish I could keep it to myself and increase my chances of winning :)...that wouldn't be very nice, would it? So, I'm sharing the info with my crafty friends. Hop on over to the Everyday Cricut blog and check it out - while you are there, check out all of their fabulous projects! Joy and Melanie are very creative.
Good Luck to everyone that enters!!
And don't forget to check out the E2 launch on HSN at midnight on 04/26/11.
The giveaway isn't here on my blog...but I do know where you can go to enter to win. :)
To enter, stop by Robyn, My Pink Stamper's, blog. ProvoCraft donated an Expression 2 for Robyn giveaway on her blog in celebration of the launch on HSN on April 26th. Robyn will choose the winner right before the launch during her My Pink Stamper Live broadcast.
You still have plenty of time to stop by and check out her blog and enter to win...so head on over before you miss out. She has posted several ways to enter. Good Luck!
Well, this is the last of my "catch-up" posts showing projects I've made over the last couple months. This project is an Accordion Book I was inspired to make after watching Robyn's (My Pink Stamper) video - here is the link. This was my first attempt at an 'album' like this and I really like how it turned out. Now I just need to figure out either (1) what pictures to put in it, or (2) who to give this to as a gift.
Although I didn't use my Cricut when working on this project - it does in fact have a Cricut cut on it - I used a left over cut from my scrap stash. I also used my Cuttlebug "Seeing Spots" embossing folder to emboss the front cover. The "memories" sentiment is from the My Pink Stamper Family and Friends stamp set. The ribbon is also from my stash and the flower is a Prima flower.
The front and back covers were made by cutting down an 8 1/2 x 11" piece of Recollections cardstock to 4 1/4 x 4 1/4" and layering 4 pieces together for both the front and the back. All in all, I cut 8 pieces to 4 1/4" x 4 1/4". The inside was created by using 3 sheets of 8 x 8" DCWV cardstock and scoring it. For detailed instructions on how to score it - please check out Robyn's video. I then adhered the 3 pieces together and adhered the 'inside' pieces to both the front and back covers using my ATG gun.
This is a baby shower card I made for a co-worker - he and his wife were expecting their 2nd child. They were blessed with their second daughter, Mia, on 03/21/11.
The card is standard A2 - 5 1/2 x 4 1/4". For this card, I used Recollections cardstock and DCWV paper - the DCWV paper is the white paper that has the boxes on it.. The baby carriage was cut Designer's Calendar cartridge - sorry, I don't remember the size. I embossed the carriage with my Cuttlebug to add a bit of texture and also added a brad I had in my stash. I used a Martha Stewart punch around the page border bunch on the background paper. The sentiment is a stamp. I used pop-dots to add some dimension to the card. Not sure you can see it - but there is also a piece of brown ribbon (from my stash) on the background layers.
Our entire team signed the card and gave it to him along with some gifts from the team.
Thanks for stopping in and having a look. I hope you have a fabulous day!
Today I have another project I made a while back....I made this birthday card at the monthly crop I attend in February for my SIL whose birthday was on 03/29/11. She loves cats and her favorite color is purple - so I wanted to combine both in her card.
This is a standard A2 size card. I cut the cat from the Rock Princess cartridge - page 53. The green layer was cut using one of the Spellbinder's Nestabilities sets - Labels Eight. The paper and ribbon is some that I had in my stash. I added some Stickles to the headphones to make them pop a bit. The "Happy Birthday" sentiment is a sticker I had in my stash - it's from Creative Memories.
This is another card I made several weeks ago for a dear friend who had a lot going on and I wanted to let her know I was thinking of her.
This is one of my first projects made with the Cricut Imagine. I am loving this machine! Makes card making a snap - makes it so easy to get coordinating papers/colors. I used the Better Together Imagine cartridge for this card. I added some Skittles to the side for some embellishment.
The content on this blog is being shared for your personal enjoyment. None of the information/projects on this blog are to be used for publication, contest submission, or commercial use.
You may use the information for personal projects and/or to make gifts. If you make any creations based on what you've seen here, please leave me a link so I can stop by and check it out. I love to see completed projects.
If you enjoy what you see, please leave me a comment. I love to hear your thoughts and impressions.
If I've used the works of others, I will direct you back to their blogs so you can see the original information. Please do the same if you use my works or the works of others in your creations.
 My Memories Suite Winner


